Nov 29, 2008

Custom Interior


I was able to clean up the install a little more. I found the right cap to screw over the calibration button. While I was at it, I took the idiot surround and sanded the back of it on a belt sander. It helped the idiot surround fit a little better.


I spent the day mounting my Lambda gauge in place of the stock (worthless) clock. It was a little tricky.

•First I took the stock idiot cluster apart.


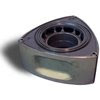
•Took all the components of the clock out of the idiot cluster. I was careful not to break the circuit board or any other elements of the warning system. Here is the piece I took out. I ended up cutting the clock knob off with some tin snips.


•I then had to take a file to the white housing. The area where the clock used to be has to be smoothed out to allow the lambda LCD gauge to fit in the slot where the clock used to be. There are little nubs that needed to be filed off. I circled the nubs, and dotted the area that needs to be filed down. There are nubs behind the dotted area that also need to be smoothed out.


• Ran the LCD gauge and all wires for the LED and calibration button up through the dash. This is the LCD gauge that came with my LC-1 wideband controller. I've seen similar displays at Radio Shack. Here you can see the little LED that tells you if your sensor is warmed up, calibrated, etc. There is also a calibration button not pictured.

•Drilled two holes in the clear plastic lens so the LED and calibration button will mount on the outside of the lens. There is already one hole from the clock knob.
SIDE NOTE: I have a Series 4 cluster, but a Series 5 dash and idiot surround. I found a little trick that helped me out. If you turn the clear plastic lens upside down, and cut off the tabs for the tiny (useless) screws, the Series 5 surround fits the Series 4 cluster. So I drilled two holes on the opposite side from the original clock knob.


•Ran all LED and button wires through the cluster. Just make sure all the wires are run through the correct route before you connect everything.

•Crimped and heat shrink for
LED and button wires.

•Took the black panel (with all the warning symbols) and cut it right before the window for the clock. The LED gauge will take the place of this piece.


•Re-assemble carefully.


EDIT* July 6th, 2009


I touched up the install. I took a un-cut warning light lens and just put the digital AFR gauge behind the stock, clock lens. It looks a little cleaner, and more like a stock component.

Nov 28, 2008

Look At Those AITs!!

Look At Those AITs!!


Here is a 4th gear pull from about 3000 to 6000 RPMs. I have a 9psi wastegate spring, but you can see, in 4th, it gets up to about 12 psi. The car is tune for that range, so it isn't a big deal... The turbo is just letting me know it wants to be opened up some more!!

The outside temp was around 70*F. I am running 50/50 water/methanol. It's great to see the AIT drop under boost like that.


Nov 26, 2008

Videos As Promised

As Promised


Interior gauge shot


Muffled Tips in


No muffled tips, APexi N1 dual exhaust, 3.5" downpipe, 3.5" midpipe.


>
Muffled Tips in


No muffled tips, APexi N1 dual exhaust, 3.5" downpipe, 3.5" midpipe.


Listen foe the wastegate to open, the tails lights burst away pretty quick!


2nd Gear blast passed.

Fuel Pressure Regulator Upgrade

Now I Know

Fuel system is just about there. I went with the Aeromotive Fuel Pressure regulator and an running -6 fuel lines to the rails. I will be running -8 to the tank next, and then changing the fuel rails to run in parallel.

Now I will be able to tell if there is an issue with the fuel pressure at a glance... Finally. This could've saved me a lot of guess work earlier.

Nov 22, 2008

First NA, First Vert

First NA, First Vert


I went to look at this car and was told it had no wheels, and didn't run. I could tell there were some minor body issues just by the pictures... but it does look to be a photogenic car.


My buddy hooked me up with these saw-blade T2 rims before I left to check out the vert so I could at least roll it on the transport.


Overall, she looks alright, a little worse than the original sellers pictures let on.

A Closer Look

A Closer Look


This car is all there, but really needs some TLC to make her shine in person. I have a S5 front bumper and fenders at my disposal, but don't know where to start for the driver-side door. I really don't want to buy a T2 hood, but this one is pretty beat up. There is much hail damage and the vent shroud is broke.

Vert Details

Vert Details


Interior is so-so. It's all there except the radio, but there are a couple switches that need to be properly connected. The seats are not so good, but the rest looks like it just needs to be tightened and polished.


I've already noticed that there is no EGR fuse, and there is a huge vacuum leak after the Mass Air Flow Sensor. I think I can get her running after fixing those issues and flushing the fluids. The seller tried to start her for me but no dice. I heard both rotors pulsing alright as it cranked... then I noticed there was no EGR fuse so it wasn't gonna start.


Anyone know what exhaust this is??!?!? It looks pretty slick on an FC, but I've never seen it before.


The seller threw in this OBX header. Looks really nice, but I definitely don't want to go this route on the vert. She is just a cruiser.

*EDIT
I never got the car running and sold her.  But my friend bought the car and had it running in a week!  We went to a meet together and it looked really slick!

Nov 10, 2008

Fun Fuel Follies

Fun Fuel Follies

The 7 has been in the shop for a while with some issues we just couldn't seem to track down. The biggest problem has been fuel pressure. I busted one stock fuel pressure regulator so we began to track down the issues. We found fuel pressure to be 20 psi too high on start up, and more than that under load. After opening up the fuel tank to get to the pump, we noticed the tank was rusting out... AGAIN. This is the second tank to rust on me. Just to clarify, I live in Arizona... in the desert!!! I'm tired of replacing tanks so on the third tank, I grabbed some POR15 fuel tank sealer and sealed this bad boy up. No pics, but it was an easy process, but hard work. After that, I ordered a new fuel pump. The old Walbro was very load, and had varied fuel pressure.


TWICE PIPES


Now that I have the T04E, my 3.5" to 2.5" exhaust is useless. It's choking up my spool time and creating unnecessary back pressure. I changed to a 3.5" midpipe where the Magnaflo used to be, and then split to two 2.5" pipes with Apexi mufflers on the tips. It changes the whole stance of my car and makes it look much more aggressive. The only down side is, it's much louder too.


So What Series is This?


I know she's a bit dusty. She's been hanging out at the shop for too long. Anyway, I found the last pieces for my complete Series 5 interior swap. The rubber S5 radio surround really finishes off the dash. I've got to do a little work to get the idiot surround to fit with an S4 idiot cluster. But the rear hatch cover really sells the conversion!! I was so stoked to get this for $15!!!!!! It's in great shape, but needs just one stud on the passenger side to hold it in place.